AWS Networking Essentials: Designing a Secure Cloud Infrastructure
Cloud Day Series: Day - 6

I am an Android Developer, currently GSSoC'23 Open Source Contributor. Full Stack Developer Trainee at KodNest and Ex-Intern at IIT, Kharagpur.
And like to share new updates about new technologies I learned, my experience and challenges.
Shalom Everyone 👋,
Welcome to Day 6 of our Cloud Day Series. I'm so happy you're here with me! In our previous blog, we delved into the world of AWS networking, where we explored various networking concepts, including AWS regions, availability zones, IP allocations, subnets, and essential security principles. Today, we will be going to design our cloud solution.
If you're new here, I'm Ashok, a recent graduate with a passion for technology and development. On Hashnode, I pen down my insights on DevOps within the AWS Cloud and discuss nuances of React and React Native development.
Now that you know a bit more about me, let's embark on today's Cloud adventure 🚀...
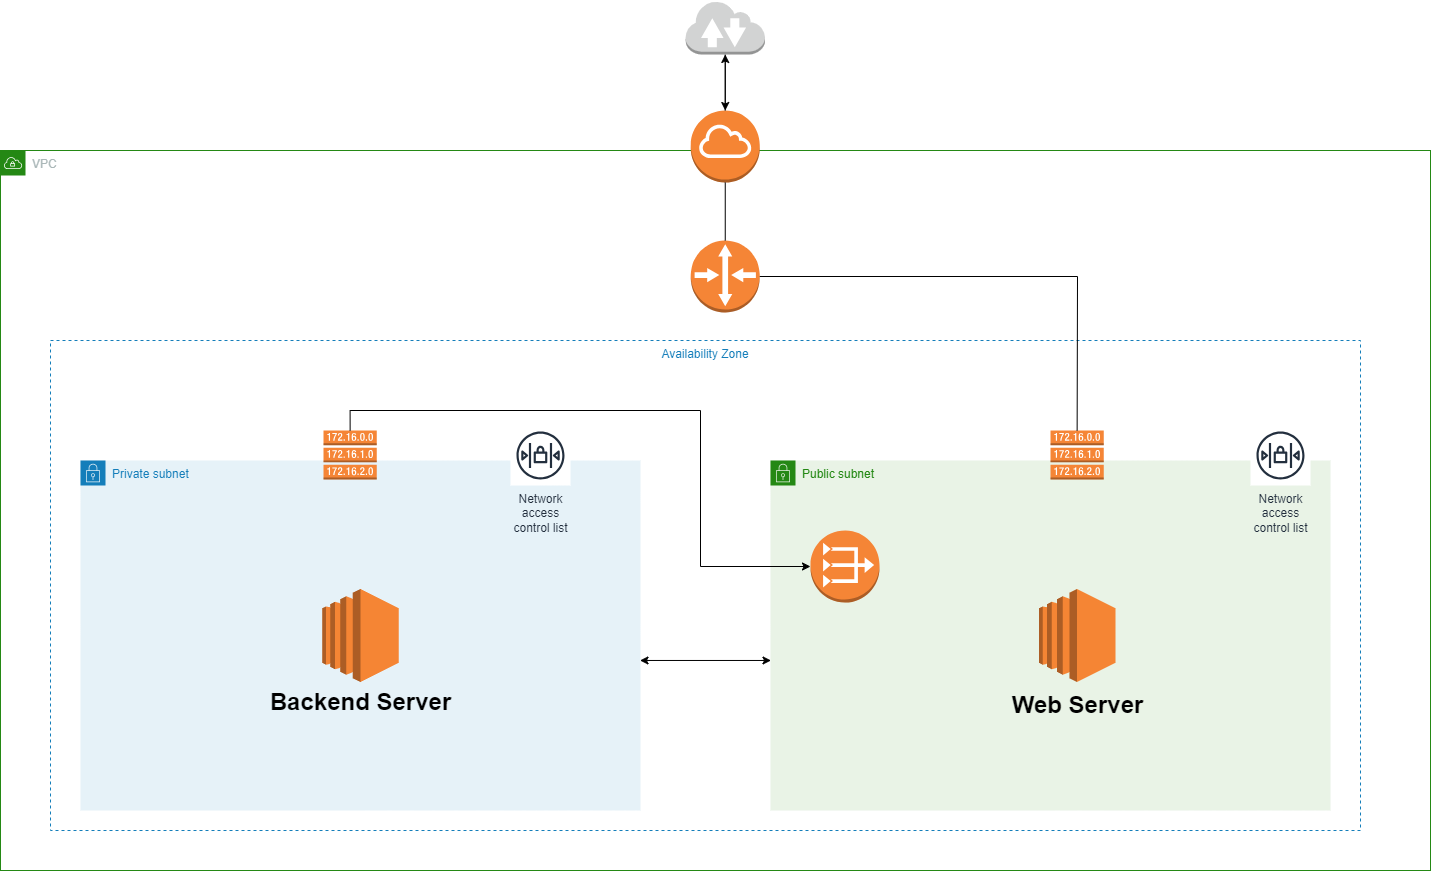
In this article, we'll embark on a journey to design a cloud infrastructure tailored to our specific solution. We'll roll up our sleeves and construct our very own virtual private cloud (VPC) space within the vast AWS Cloud – and just to clarify, we won't be using the default VPC. Our goal is to establish both public and private subnets within our new VPC, and, as the grand finale, we'll host a web server in the public subnet while sheltering our precious backend server in the private subnet. So, let's dive in and start building our AWS infrastructure step by step.
Our primary goal is to gain a deep understanding of how the network functions within our cloud space and how it establishes communication with the vast internet. In this tutorial, we will delve into the intricacies of designing our cloud solution.
Cloud Solution:
Create new VPC
Let's break away from the default and forge our path by creating a new Virtual Private Cloud (VPC). This empowering move allows us to tailor our AWS network environment to meet our unique requirements, ensuring greater flexibility and control.

Selecting an Availability zone...
Turning our attention to availability zones, for the purpose of this example, we will focus on selecting just one availability zone (AZ). This simplified approach will help us grasp the core concepts before we expand our architecture to include multiple AZs.

Private and Public Subnets
Now We added two subnets to our VPC, one is a private subnet another one is a public subnet. We host our web server in a public subnet and our backend server in private subnet.

Internet Gateway
In our exciting journey to build a robust cloud infrastructure, we've reached a pivotal moment. We're about to make our web server accessible to users all around the globe by creating a direct pathway to the internet. How do we accomplish this? By attaching an Internet Gateway to our Virtual Private Cloud (VPC).
Think of the Internet Gateway as the front door to our cloud space. It's the bridge that connects our VPC to the vast internet, making it possible for users to access our web server.

Router and Route Table
When someone on the internet wants to visit your web server, it's like they're embarking on a journey. Their request begins on their device, travels through the internet, and eventually reaches your Internet Gateway – think of it as the entrance to your cloud space. At this gateway, the request needs to know where to go next, and that's where the route table for your public subnet comes in. You've set up a default route (0.0.0.0/0) in this route table, which acts as a guiding light for internet-bound traffic. The request follows this route, signaling that it should pass through the router connected to your public subnet.
The router's main job is to efficiently manage traffic within your cloud space. When the request arrives at the router, it figures out that it's meant for your public subnet, thanks to the route table's instructions. The router then makes sure the request reaches the public subnet, where your web server is ready and waiting. Your web server takes care of the incoming request, whether it's fetching a web page, handling an API request, or anything else related to the web. Once your web server generates a response, the outbound data follows a similar path in reverse.
The router recognizes that the response needs to head back out to the internet, and it consults the route table to find the way. The Internet Gateway plays its role here, sending the response to the original requester on the Internet. It's like a well-orchestrated back-and-forth, ensuring that your web server can serve users on the internet seamlessly.

NACL for Subnet Level
NACLs control inbound and outbound traffic at the subnet level within your VPC. Each subnet can be associated with a specific NACL. As you mentioned, your web server is in a public subnet. The NACL associated with the public subnet plays a key role in allowing or denying traffic to and from this subnet. For your public subnet, you would typically configure NACL inbound rules to allow incoming traffic that is meant for your web server. This could include rules allowing HTTP (port 80) and HTTPS (port 443) traffic, for example. The rules should permit external users to access your web server.
Outbound rules in the NACL can be configured to control the traffic leaving your public subnet. For a web server, this might include allowing the server to make outgoing requests to specific destinations, such as external APIs or databases or our backend server.

Our Web and Backend Servers
In our cloud journey, we've reached a major milestone. We've set up two Amazon Elastic Compute Cloud (EC2) instances in different subnets, each with its own role. First, there's our web server in the public subnet. This spot gives it direct internet access, so users can send requests and get responses quickly.
Then, in the private subnet, we've tucked away our backend server. This adds an extra layer of security since the backend server isn't exposed to the internet directly. That means it's less vulnerable to potential threats. Even though the backend server is hidden from the outside world, it can still smoothly communicate with the web server when needed.
This setup follows the "principle of least privilege," which means we only grant public access to the web server when it's necessary. We safeguard the sensitive backend server from any unauthorized external access. With these instances in place, we're ready to set up the right security groups, Network Access Control Lists (NACLs), and routing rules. These elements are essential for maintaining strong security while allowing effective communication between our instances.

NAT Gateway for Private Subnet
Connecting a NAT Gateway to our private subnet is like establishing a secure link to the internet while keeping our private network's inner workings hidden. Think of the NAT Gateway as a trusted middleman with a dedicated phone line to the internet. It sits in our public network, ensuring that requests from our private network find their way to the internet while keeping the private network's details safely tucked away. By configuring our private network's route table and adjusting security settings, this setup allows our private network to reach the internet, whether it's for software updates or cloud services, all while maintaining a discreet internal presence. It's a security-conscious connection that strikes a balance between convenience and privacy.
Conclusion
Thank you for joining with me on this Blog series. I hope you learned how to design our own cloud solution how networking works within our private cloud space and how to make it accessible through the internet. If you found it valuable, please show some love with a ❤️ and share your thoughts 🤗.
See you in our next Cloud Day Series... Farewell for now! 👋
Let's connect on ...


